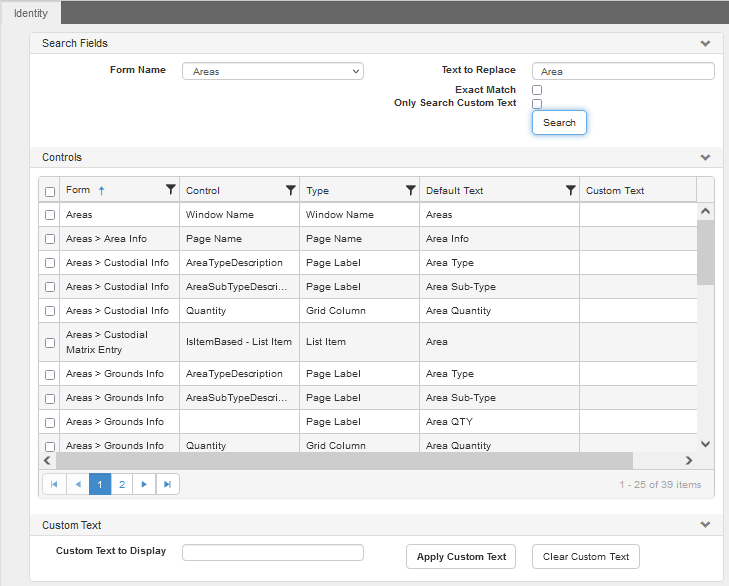
Path: Admin > Text Management
If your organization doesn't use the default hierarchy names (Division, Region, District, etc.) or other labels, you can change them to reflect your own terms using Admin > Text Management. Your new term appears in the Custom Text column on the window.
Text Management Details
You have the option to change the nomenclature on a selected form or all references throughout WebTMA. This includes buttons, toolbars, windows, tool tips, and any other place where the term occurs. Use caution if you elect to make global changes.
The window columns identify the Form name, Control, Default Text, and Custom Text.
Review each change carefully to be certain you have the correct form and type of control you want to change.
One exception to creating field labels is the UDF (User Defined Fields) Tab. Each organization can create and use fields for their own purposes. The labels for these fields are created by your WebTMA System Administrator from Admin > Form Attributes > System Form Attributes–User Defined Fields Section.
How to Change Label Names in WebTMA
Use these instructions to replace specific words on some or all WebTMA Forms.
- (Optional) Select a Form Name if you want to limit changes to one Form. Leave the field clear if you want to find all instances of the text entered in step 2.
- Type the existing term or character string in the Text to Replace field.
- (Optional) Click the Exact Match and/or Only Search Custom Text check box to refine the search.
- Click the Search button on the window, and WebTMA returns a list of places where the term appears.
- Type your revised text in the Custom Text to Display field below the grid.
- Click to mark the check box of all Forms you want to change. Note: You have the option to click the check box in the grid header (to the left of the Form label) to replace all instances of the term.
- Click the Apply Custom Text button to replace the default term with your new term. Your new term is shown in the Custom Text column.
- Click Save on the WebTMA toolbar to save your change.
The new term is visible when you view any of the forms you checked.
How to Locate Changed Text Terms
To locate Forms containing the new terms:
- Go to Admin > Text Management.
- Type the desired text in the Text to Replace field.
- Click the Search button on the window.
All Forms that contain your Custom Text are displayed.
How to Delete Changed Terms
- Go to Admin > Text Management.
- Type the desired text in the Text to Replace field.
- Click the Search button on the window, and WebTMA returns a list of places where the term appears.
- Click to mark the check box of all Forms you want to clear.
- Click the Clear Custom Text button.
- Click Save on the WebTMA toolbar.
This removes your changes from the Custom Text column.
Want to Learn More?
Visit the WebTMA Help Page