Path: Organization > Repair Centers > Shop
Use the Shop level to group Technicians who share a similar Trade.
Examples of some familiar Shops are Carpentry, HVAC, Electrical, Mechanical, Grounds, and Plumbing.
Shop Details
This approach may differ from the way your organization uses the Shop concept. Some use Shops as a division of responsibility, not as a group of similar Trades.
For example: Assume a hospital has two Shops—General Maintenance and Plant Engineering. Each Shop includes a variety of Trades (i.e., plumbers, carpenters, electricians, etc.). This means each hospital Shop contains an Electrical Trade, a Carpenter Trade, a Plumbing Trade, etc. instead of Trades related specifically to the function of the Shop.
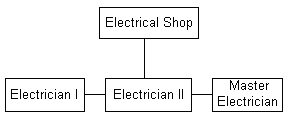
Whereas, an Electrical Shop in a Trade-related grouping includes all Trades related to electrical work, such as Journeyman Electrician, Apprentice Electrician, and Electrician Helper.
With careful planning, you can modify the setup to meet your needs.
Shops Identity Tab
Path: Organization > Repair Center > Shop / Identity Tab
The Shop Identity Tab is used to record the name, address, and contact information about the Shop as well as assign the Shop to Repair Centers. At least one Repair Center must be assigned.
How to Add a Shop Record
- Open the Shop window.
- Click Add on the WebTMA toolbar.
- Assign a unique Code to help identify the Shop. Alpha-numeric characters are allowed.
- Type the full Name of the Shop.
- Complete as many of the elective fields as possible.
- Go to the Repair Centers Tab.
- Select the Repair Centers associated with the Shop.
- Click Save on the WebTMA toolbar.
See Repair Centers Tab for more information about assigning Repair Centers.
Repair Centers Tab
Use the Repair Centers Tab to associate one or more Repair Centers with a record. Only users that are assigned to the associated Repair Center(s) can see and use the record.
You are reminded to assign a Repair Center if you attempt to save a new record without selecting at least one Repair Center. Without a linked Repair Center, no one can view the record or assign work to an employee or for an item.
How to Affiliate a Repair Center with a Record
You can add as many Repair Centers as needed to a record. In Add or Edit mode:
- Select the Repair Center Tab.
- Choose the Add Repair Center link at the top of the grid to open the Repair Center Entry flyout.
- Mark the check boxes of all applicable Repair Centers. Tip: To select All Repair Centers, mark the check box next to the label Repair Center Code.
- Select the Add Selected button.
- Choose Save on the WebTMA toolbar.
Work Orders Tab
The Work Orders Tab is a read-only window used to review open or closed Work Orders that pertain to the specific record. Sections on this window labeled Open Work Orders and Closed Work Orders filter the Work Orders for you.
For a quick description of the Work Order, expand a line to see details about the Task and Trade on the Work Order. Choose the Work Order number to open the Work Order record in a separate browser tab.
NOTE: Although new Work Orders created in WebTMA 7 only allow one Trade per Task, data converted from WebTMA v. 5.x may have multiple Trades for some Tasks. The following statement applies only to converted data: Any converted records display all Trades previously assigned to a Task. These are separated by a comma. The Trades are found in the Trade column on the Work Order Task grid.
Cost Tab
The Cost Tab on many location and item records displays the accumulated costs, both current and historical, relating to the record. With the exception of the Work Order / Cost Tab, this is a read-only Tab. Charges accumulate on this window as they are incurred. The values are not dependent on posting charges.
The Year-to-Date values are for your fiscal year and are based on your Fiscal year setting in Admin > Client Info / Preferences.
Want to Learn More?
Visit the WebTMA Help Page