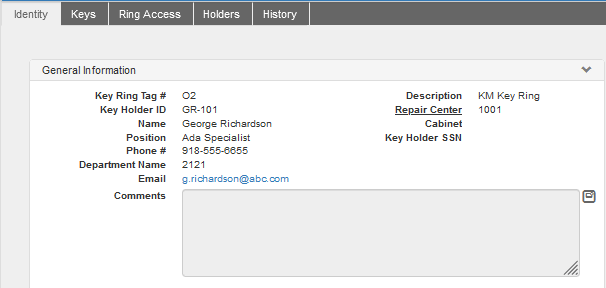
Path: Material > Key Management > Key Rings / Identity
By creating Key Rings, you can issue an entire set of Keys to Key Holders rather than issuing each Key separately.
Every Key Ring must have a unique name. This assures that only one Key Holder has a particular Key Ring.
Other than naming and describing the Ring, and possibly assigning a Repair Center, the fields and Tabs are read-only. Key assignments and Key Holder assignments are made from the Key Management / Key Adjustments window.
Assigned Keys can be seen on the Key Rings / Keys Tab. These are the Keys that are assigned to the Ring from the Key Management / Key Adjustments window.
How to Create a Key Ring
To create a Key Ring record from the Key Rings window:
1. Click Add on the WebTMA toolbar.
2. Type a Key Ring Tag #. This is an alphanumeric field.
3. Type a Description of the Key Ring.
4. (Optional) Type or select a Repair Center.
5. Click Save on the WebTMA Toolbar to save the record.
6. Go to Material > Key Management > Key Adjustments to add Keys to the Ring.
Once a Key Ring is assigned to a Key Holder, the other fields on this window are populated automatically.
How to Add or Remove Keys from a Key Ring
Path: Material > Key Management > Key Adjustments
Most actions concerning Keys are handled from the Key Adjustments window (Material > Key Management > Key Adjustments).
From the Key Adjustments window:
- Click Add on the WebTMA toolbar and select the Technician who is making the adjustment.
- Click the Add Key Adjustment link.
- Select the Code (10 to Add, 11 to Remove) on the Entry flyout.
- Complete the required and elective fields.
- (Optional) Click the Save & Add button to make other adjustments.
- Click the Save button on the Entry flyout.
- Click Save on the WebTMA toolbar.
When a Key Ring is ready for storage, you can make these assignments from the Key Adjustments window using Code 15 (Add Ring to Cabinet) and Code 14 (Remove Ring from Cabinet).
How to Issue or Return Key Rings
Path: Material > Key Management > Key Adjustments
Most actions concerning Keys are handled from the Key Adjustments window (Material > Key Management > Key Adjustments).
From the Key Adjustments window:
- Click Add on the WebTMA toolbar and select the Technician who is making the adjustment.
- Click the Add Key Adjustment link.
- Select the Code (12 to Issue, 13 to Return) on the Entry flyout.
- Complete the required and elective fields.
- (Optional) Click the Save & Add button to make other adjustments.
- Click the Save button on the Entry flyout.
- Click Save on the WebTMA toolbar.
The ![]() icon at the right of the Key Holder Code field is used to "Display keys linked to this holder." Click the icon after you select a Key Holder to see the Key Holder Info flyout with a list of Keys issued to the selected Key Holder.
icon at the right of the Key Holder Code field is used to "Display keys linked to this holder." Click the icon after you select a Key Holder to see the Key Holder Info flyout with a list of Keys issued to the selected Key Holder.
Want to Learn More?
Visit the WebTMA Help Page