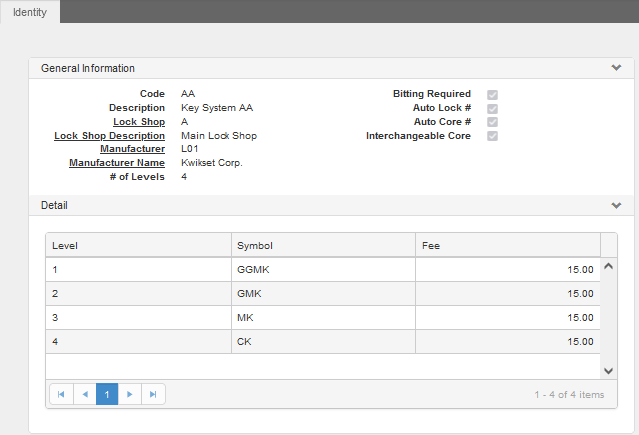
Path: Material > Key Management > Key System
The Key System window is used to create an optional record that can formalize the Parent / Child relationships of Key records. It is used to establish multi-level master Keying systems including a change Key level.
To be successfully associated, the following records must belong to the same Key System or have no Key System affiliation.
- Parent Key to Child Key
- Key to Core
- Key to Lock
- Core to Lock
- Key to Bitting
- Key to Cabinet
The grid at the bottom of the window lists the Symbol names of the different master and change Key System Levels. The first line or lines represent master Keys; the last line is a change Key.
Be sure to include a Change Key level in your Key System, which allows you to affiliate these Keys with Interchangeable Cores.
Key System Specifics
WARNING: Plan your Key Systems carefully before you create the records. Certain fields and actions on this window cannot be altered or added once a new record is saved. This means, for example, that if you plan to use Interchangeable Cores in the future, the Interchangeable Core check box must be marked on a new Lock Shop record when you create it. You cannot return at a later time to edit the record and add this ability.
When you click Save, you receive the following alert: After save, adding and removing levels, Key Bitting, and Interchangeable Core is no longer available. Do you want to Continue?
How to Add Key Systems
Key Systems cannot be added until you add a Lock Shop record.
It is essential to have a list of your multiple levels and enter them in the desired order. The row number is controlled by WebTMA. Before you save a new Key System record you can delete a level but you cannot change the level number. After saving you can edit the Symbol name and Lost Fee fields, but you cannot add more levels.
In Add mode on the Key System window:
- Enter the unique Code and a Description to help identify it.
- Select the associated Lock Shop.
- Complete any needed elective fields. Reminder: If you plan to assign cores in the future, be sure to mark the Interchangeable Core check box. It cannot be edited later.
- Click the Add Row link to open the Key System Entry flyout.
- Enter the Symbol and optional Lost Fee.
- Click Save & Add to continue adding levels.
- Click Save on the flyout when all levels are added.
- Click Save on the WebTMA toolbar.
Want to Learn More?
Visit the WebTMA Help Page